As we transition from fall into winter, there’s something magical about bringing the enchanted forest indoors. DIY enchanted decor transforms ordinary items into cozy seasonal treasures: glowing jars filled with pinecones and winter greenery, frosted branch displays, and repurposed fairy lights that twinkle like stars through a snowy forest. The best part? Creating your own DIY enchanted decor is budget-friendly, perfect for the colder months, and brings that warm, magical atmosphere we all crave when it’s cold outside.
This post contains affiliate links. We earn a small commission if you make a purchase at no extra cost to you.
Winter Fairy Light Jars: DIY Enchanted Decor That Glows
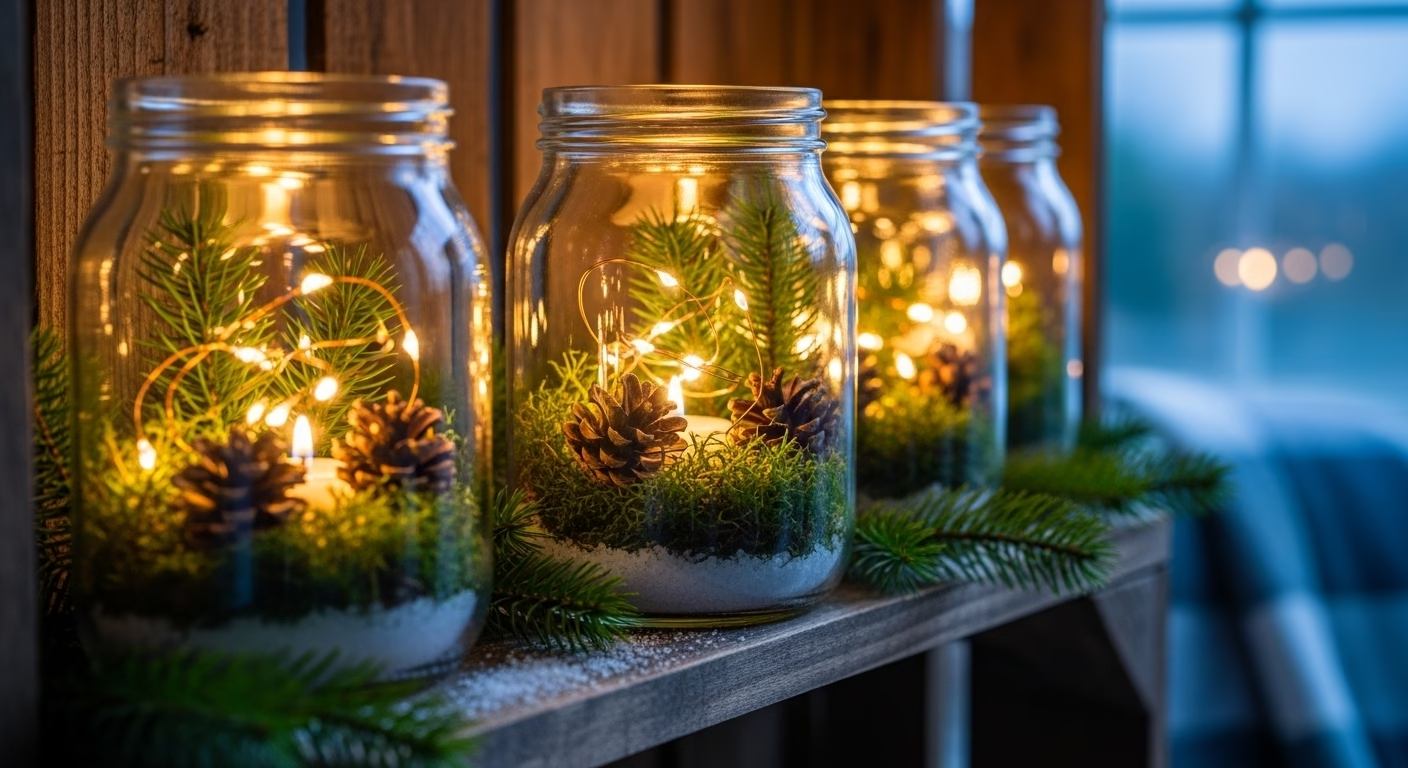
Let me tell you about my favorite cold-weather project: turning simple glass jars into glowing winter lanterns. As the days get shorter and darker, these little lights become pure magic. I like using battery-powered fairy lights because there’s no outlet hunting involved, and you can put these jars literally anywhere.
The key is layering. Start with your jar (mason jars work great, but any clear glass jar works), add winter-appropriate natural elements, then nestle your lights inside. I’d make a few because once you see how cozy they look, you’ll want them everywhere.
Here are some tips that actually work:
- Frosted jars give you that winter window look, but clear jars show off your layers better. Both are beautiful.
- For natural elements, try pinecones (free from your yard!), small evergreen sprigs, cinnamon sticks, or dried orange slices
- Sprinkle a thin layer of Epsom salt at the bottom to mimic snow, but don’t overdo it or you won’t see your lights
- Group three or five jars together in different sizes for more visual impact
- Warm white or soft white lights feel cozier than cool white, which can look a bit harsh
Cozy Essentials to Make Your Winter Lanterns Shine:
- Fairy Lights – Thin, bendable strands that fill jars with a warm, magical glow.
- Mason Jars – Frosted for soft, dreamy light or clear to show off layered decorations.
- Pinecones & Moss Packs – Bring a touch of winter forest indoors without leaving the house.
- Dried Orange Slices – Add color and subtle, natural fragrance.
- Cinnamon Sticks – Rustic texture and that classic cozy aroma.
- Epsom Salt Snow – Sprinkle at the bottom to mimic fresh, sparkling snow.
- Evergreen or Cedar Sprigs – Adds lasting greenery and natural texture.
- Twine or Velvet Ribbon – Simple decorative touch to make jars gift-ready.
Upcycled Winter Bottles: Easy DIY Enchanted Decor
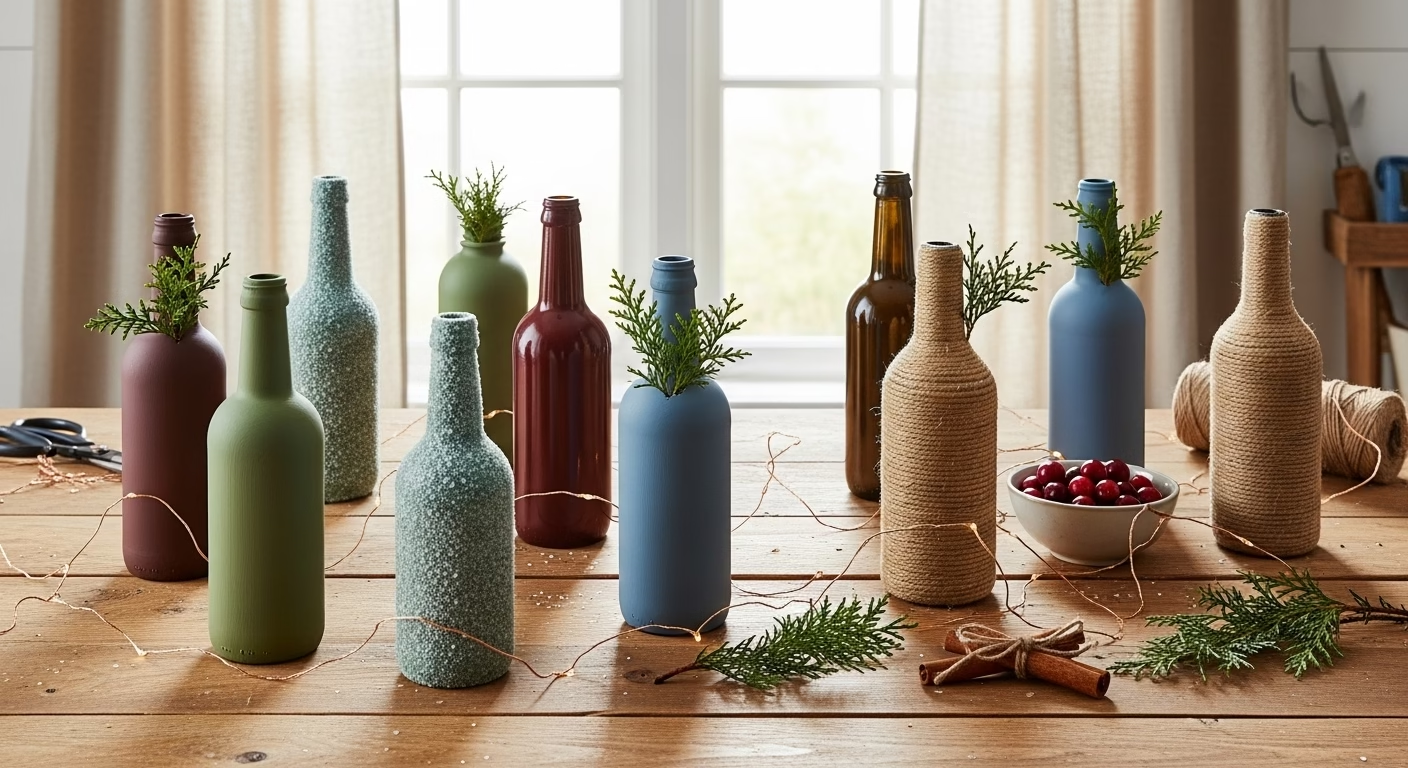
Before you recycle those wine bottles, pasta sauce jars, or old candle containers, give them a second look! They’re perfect for creating DIY enchanted decor this winter. I’ve made some of my favorite winter pieces from bottles I almost thrown away, and there’s something really satisfying about turning “trash” into something beautiful.
For the enchanted forest aesthetic that’s trending this winter, stick with colors that feel both mystical and current. Rich burgundy, deep moss green, warm chocolate brown, dusty blue, and terracotta clay tones all work beautifully together and perfectly capture the cozy winter mood we’re all after.
DIY Ideas that are actually doable:
- Paint small glass bottles with acrylic paint (chalk paint works great too) in deep moss green, rich burgundy, chocolate brown, or dusty blue, then add fairy lights
- Wrap natural twine around jars in a spiral pattern and hot glue small evergreen sprigs or cinnamon sticks to it
- For a frosted “snow” effect, brush Mod Podge on clear bottles and immediately roll them in Epsom salt. It dries sparkly and looks like ice!
- Remove labels completely (soak in hot soapy water) and fill clear bottles with cranberries, then drop in waterproof LED tea lights
You Might Want to Grab for DIY Winter Bottle Decor:
- Glass Bottle Set – Perfect if you want matching bottles; sets usually come in different heights for a cohesive display.
- Twine & Lace – Natural jute twine gives a rustic forest feel, while lace adds a soft, delicate texture.
- Epsom Salt – Essential for frosted, snowy effects; coarse grain works best and one bag lasts for multiple projects.
- Acrylic or Chalk Paint – Deep moss green, rich burgundy, chocolate brown, or dusty blue bring that cozy, mystical winter vibe.
- Battery-Powered Fairy Lights – Small lights make bottles glow from the inside for an enchanting effect.
- Hot Glue Gun & Glue Sticks – Secure twine, sprigs, or cinnamon sticks with minimal fuss.
- Small Evergreen Sprigs & Cinnamon Sticks – Add texture, color, and cozy scents to your bottles for a forest-inspired look.
Frosted Branch Displays: Magical DIY Enchanted Decor
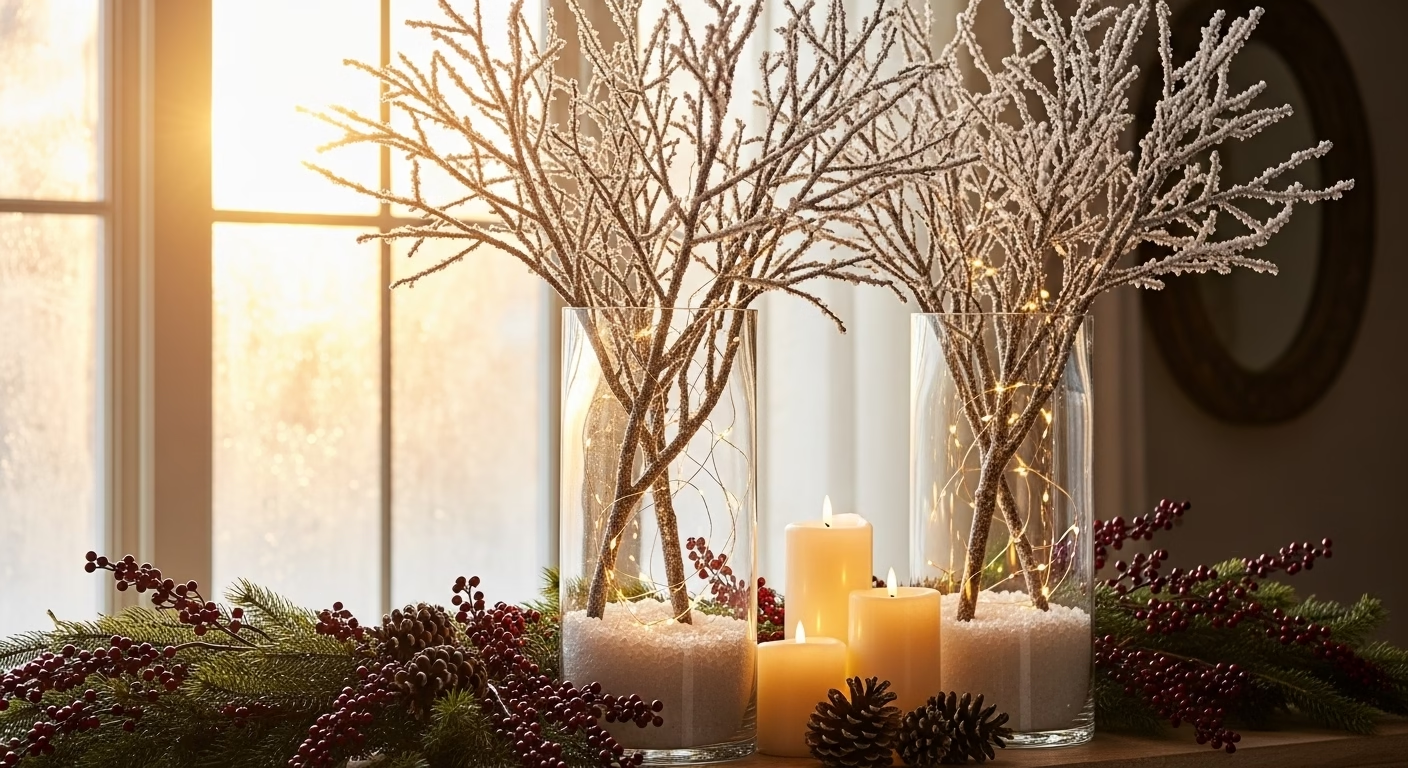
This DIY enchanted decor project looks way harder than it actually is, which I love. Frosted branches are stunning and create that magical winter forest vibe without much effort. You can make them yourself in about 30-45 minutes, or just arrange natural branches for a minimalist look.
The best time to collect branches is after a storm or on a walk through your neighborhood (always ask if you’re on someone else’s property). Look for interesting shapes like twisting branches, ones with unique bark texture, or branches that fork in interesting ways. Bare branches are perfect because they look intentionally wintry.
Tips for winter branch displays:
- Branches about 2-3 feet long work best for most vases
- To make frosted branches, spray paint them white first (optional but makes the frost effect more dramatic), then spray with adhesive and sprinkle with Epsom salt
- For the best results, work over newspaper and apply adhesive in sections, then spoon or sprinkle Epsom salt over the wet areas
- Let dry for 45 minutes, then flip and repeat on the other side
- Silver spray paint on just the tips gives you that icy effect without covering the natural bark texture
- Battery-powered fairy lights (the thin wire kind) weave through branches way easier than plug-in strands
- Add a few pinecones, some faux berries, or small evergreen sprigs at the base of your vase to tie it all together
- If your branches won’t stand up, use floral foam, sand, or small rocks in the bottom of your vase to anchor them
Important note: Some Epsom salt may fall off over time or if the branches are moved. To help prevent this, spray finished branches with a clear sealer after they’re completely dry.
What You’ll Need for Frosted Winter Branch Displays:
- Tall Glass Vases – At least 10–12 inches tall so branches stand properly; clear glass lets fairy lights shine through beautifully.
- Epsom Salt – Large crystals give the best frosted effect; fresh salt works better than old, powdery salt.
- Spray Adhesive or Mod Podge – Spray adhesive is fast, while Mod Podge gives more control; both coat branches for a magical winter look.
- Battery-Powered Fairy Lights – Thin, flexible wire weaves easily through branches to create a glowing forest vibe.
- Pinecones, Faux Berries, or Small Evergreen Sprigs – Add texture, color, and a cozy, forest-inspired finish.
- Floral Foam, Sand, or Small Rocks – Keeps branches stable in your vase if they won’t stand on their own.
- Newspaper or Protective Surface – Makes clean-up easier when applying adhesive and Epsom salt.
- Gloves – Protect hands while working with spray adhesive, Mod Podge, or Epsom salt.
Winter Garlands: Stunning DIY Enchanted Decor
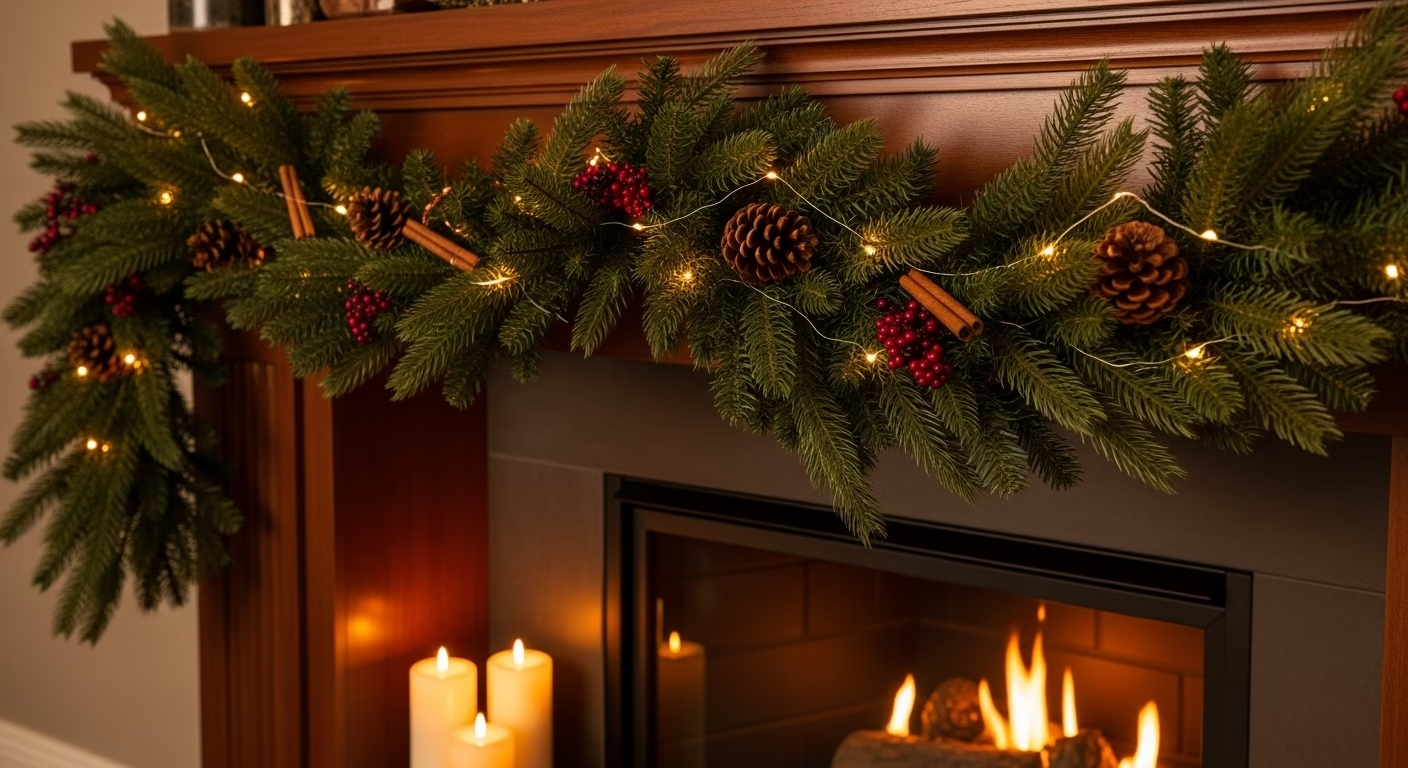
If you want to transform a space fast with DIY enchanted decor, garlands are your answer. I’m talking less than an hour from start to finish, and suddenly your whole room feels completely different. As we move from fall into winter, these garlands create that cozy, inviting atmosphere that makes you actually want to be inside.
Here’s my approach: fairy lights are your foundation. Everything else is just decoration that makes it feel seasonal. You can make this as simple or as elaborate as you want, and both ways look great.
DIY Tips that make the difference:
- Start by figuring out where you want your garland. Measure the space so you know how long your light strand needs to be
- Use removable hooks or clips (Command makes clear ones that disappear) so you’re not putting holes in your wall
- For attaching natural elements, thin floral wire works better than hot glue because you can adjust things as you go
- Layer your evergreen sprigs so they all face the same direction and overlap slightly. It looks more intentional
- Add your “extras” (pinecones, berries, cinnamon sticks) in odd-numbered groups (3 or 5) spaced along the garland
- Battery packs with timers are worth the extra few dollars. Set it once and your garland automatically glows every evening
- Don’t stress about making it perfectly even. A little asymmetry actually looks more natural and cozy
What You’ll Need to Make Enchanted DIY Garlands
- Battery-Powered Fairy Lights – The foundation of your garland, with optional timers to make it glow automatically every evening.
- Artificial Evergreen Garland Base – Provides a full, lush look in minutes; simply weave in lights and a few real touches for extra authenticity.
- Floral Wire – Thin green 22–24 gauge wire is flexible, blends seamlessly with greenery, and lets you attach elements without tools.
- Command Clear Light Clips – Hold lights securely and disappear once your garland is up, keeping walls damage-free.
- Mini Pinecones and Berries – Add texture and seasonal color effortlessly along your garland.
- Cinnamon Sticks – Bring rustic charm and a subtle cozy scent to your display.
- Decorative Ribbon or Twine – Finish your garland with bows or wraps for a polished, magical look.
Creating Your DIY Enchanted Decor Winter Sanctuary

Here’s what I’ve learned about DIY enchanted decor: it’s not about doing everything at once. Start with one jar this weekend. See how it makes you feel when you walk past it glowing in the evening. Then maybe add a few more, or try the branches, or string up some lights.
These DIY enchanted decor projects genuinely make a difference during winter. When it’s dark by 5 PM and freezing outside, coming home to spaces that glow and feel magical isn’t silly. It’s self-care. Your home should be a place you want to be, especially in the coldest, darkest months.
And nothing you make has to be perfect. My first batch of frosted branches had way too much salt in some spots. But once I put them in a vase with lights? Still beautiful. The jar where my fairy lights are bunched up on one side? I just turned that side toward the wall. The garland that droops more on the left than the right? Adds character.
This is about making your space feel like you: cozy, warm, and maybe a little bit magical. That empty corner that’s been bugging you? Perfect spot for some glowing jars. That mantel that’s just sitting there? Crying out for frosted branches. Your bedroom that feels too dark and cold? A simple garland above your headboard changes everything.
Embrace the Magic of DIY Enchanted Decor
As fall fades and winter settles in for real, these DIY enchanted decor projects bring light and warmth exactly when you need them most. Keep your fairy light jars glowing on windowsills and shelves, frosted branches catching every bit of available light, and garlands twinkling along your walls.
This isn’t about creating perfect Pinterest photos (though these DIY enchanted decor projects photograph really well if that’s your thing). It’s about walking into your home after a long, cold day and feeling like you’ve stepped into somewhere warm and magical. It’s about making winter feel less endless and more enchanted.
Start with whatever DIY enchanted decor project speaks to you. Maybe it’s jars because you already have everything you need. Maybe it’s branches because you saw the perfect ones on your morning walk. Maybe it’s a garland because you’ve been staring at that blank wall for months. There’s no wrong place to start. Just begin somewhere, and let the magic build from there.
Related posts:
 8 Dreamy Winter Home Decor Looks to Make Your Home Feel Magical
 DIY Potion Bottles: Creating Your Own Magical Miniature Worlds
 DIY Cottagecore Room Decor: 8 Budget-Friendly Ways to Get the Look
 The January Home Reset: Cozy Ways to Refresh Your Space
 Your Complete Cottagecore Aesthetic Guide: Creating a Life of Simple Beauty